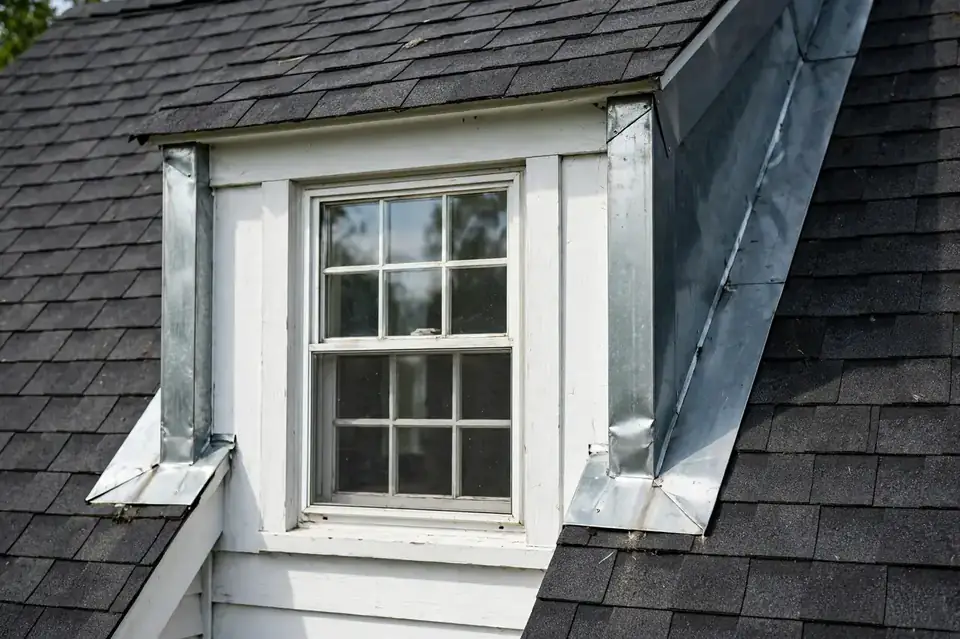
Leaking dormer? Water stains far from the roofline? Dormer flashing is the most failure-prone detail on a roof — and on West New York's pre-war buildings, much of it is decades old. Professional dormer repair rebuilds the flashing sequence correctly: step flashing, apron, and kick-out diverters.

Specific repairs for the specific ways dormers fail — no generic definitions:
Dormer cheek sidewalls opened, step flashing replaced course by course in correct overlap order — each L-shaped piece shedding onto the shingle below. Out-of-sequence flashing is a frequent cause of dormer leaks.
The front-of-dormer apron where wall meets roof rebuilt with properly lapped metal. Wind-lifted aprons and sealant-only joints are replaced, not patched over.
Angled flashing added where the sidewall meets the gutter line, throwing wall runoff into the gutter instead of behind the siding. Missing diverters are one of the most expensive oversights on older dormers.
Siding pulled back and reinstalled to lap correctly over the new metal, with compatible flashing metals throughout — no mixed-metal contact that corrodes the joint.
Water entry traced to the failed transition — cheek, apron, or kick-out — before any scope is written. Dormer leaks are famously misdiagnosed; the stain is rarely at the breach.
Other dormers on the same roof checked during the visit. When they share one flashing vintage, the leaking dormer is usually just the first to fail.
Discoloration on the exterior cheek or the wall beneath it. May indicate: water tracking down inside the cheek from a failed step flashing run.
Ceiling stains a room or two away. May indicate: water traveling inside the wall cavity along framing until gravity finds an exit.
Paint breaking down or wood trim going soft. May indicate: chronic wetting behind the siding from a long-running flashing failure.
Visible separation at the wall-to-roof joint. May indicate: step flashing displaced or missing entirely.
Apron edge lifting after storms. May indicate: wind working the front detail loose — every storm then drives rain underneath.
Water marks running down the wall under the dormer. May indicate: a missing kick-out diverter letting wall runoff pour behind the siding.
Symptoms point to where to look — they don't diagnose. A stain under a dormer can also be a failed window seal, which is why the inspection traces water to its entry point.
What the repair work actually involves, and where the limits are:
Overlapping L-shaped metal pieces woven between shingle courses up each cheek. The order is everything — flip one overlap and water runs behind the system. Rebuilds replace the full run, not one piece.
Galvanized steel or aluminum is standard; copper appears on higher-end work and outlasts both. Incompatible metals in contact cause galvanic corrosion that eats the joint from the inside.
The front apron spans wall-to-roof at the dormer base; the kick-out diverter angles wall runoff into the gutter. Kick-outs are treated as required detailing in current practice — skipping them invites hidden rot.
Siding must lap over the top of the flashing, never trap water behind it. Along the transition, siding is pulled back and reinstalled correctly — there is no proper rebuild without it.
Sealant is a gasket, not a structure. It belongs as a secondary seal behind properly lapped metal — never as the thing holding water out by itself. A "repair" that's only caulk fails within a few seasons.
Dormers punch valleys and sidewalls through the main roof — joints that handle a lot of water. Most dormer wear is schedulable; wind-lifted shingles or open valleys around a dormer are not.
In West New York's attached multifamily blocks, a leak rarely stays inside one unit for long — early action protects neighbors too.
In West New York's stacked blocks, an opening affects more than your unit: Emergency help →
Dormer leaks travel inside walls and rot framing out of sight. Call to discuss repair options for your dormers.
Call (201) 330-4743How the work moves from symptom to signed-off repair:
Step flashing up both cheeks, the front apron, and kick-out diverters examined course by course, with interior evidence traced back to the entry point.
Which transitions failed, whether siding must be pulled, and what the substrate looks like — shown and explained, not just asserted.
The repair defined: which flashing gets rebuilt, what materials, what happens if rot is found on opening. Approved before work starts.
Flashing rebuilt in correct sequence, siding reinstalled lapping over the metal, and the repair verified — a repair isn't done until the leak is.
Most dormer leaks end at the flashing. The line moves only when the leak has run long enough to destroy what's behind it:
Substrate damage should be shown to you with the added scope explained before work proceeds — rot found on opening is common; surprise invoices are not acceptable.
No invented prices — but these are the factors that set the real number:
One cheek versus both cheeks plus apron and kick-out — the number of details drives the work.
Vinyl pulls back easily; stucco, wood, or brick adds real labor to the siding removal and reinstallation.
A low street-facing dormer versus three stories up on a walk-up — access and safety setup change the price.
Sound sheathing versus rot found on opening — invisible until the transition is opened up.
One leaking dormer versus reflashing siblings that share the same failed vintage.
Urgent dispatch costs more than planned work. A firm figure only exists after the transition is opened.
Water enters at the failed flashing and travels inside the wall cavity, following gravity and framing until it finds an exit — often a room or two away. The repair targets the entry point, not the stain.
Sealant alone fails within a few seasons — it hardens, cracks, and there is nothing behind it. Durable dormer repair rebuilds the lapped metal flashing sequence; sealant is only the backup gasket.
It is a small angled flashing piece where the dormer sidewall meets the gutter line, throwing wall runoff into the gutter. Without it, water pours behind the siding and rots sheathing out of sight. If it is missing, it should be added during the repair.
Along the dormer transition, yes — the flashing sits behind the siding, so there is no way to rebuild it properly without pulling siding back. It gets reinstalled lapping correctly over the new metal.
Yes, when they share one flashing vintage. The leaking dormer is usually just the first to fail; checking the siblings during the same visit costs little and prevents the next leak.
A single dormer re-flash is typically a day's work once opened. If rot is found behind the flashing and substrate needs replacement, the scope — and the timeline — grows with it.
More urgent than it looks. Water inside a wall cavity spreads silently — sheathing and framing can rot for months before a stain appears. An active dormer leak should be assessed promptly, not watched.
Leaking dormer, stained walls, or flashing that's had enough — call now to discuss dormer repair options for your West New York home.
Call Now — (201) 330-474324/7 emergency roof repair calls answered; regular service appointments are scheduled.