Dormer leaks, failed step flashing around dormer cheeks, missing kick-out diverters, and water-stained dormer ceilings need timely attention. Explore dormer repair solutions for Secaucus homes, from localized flashing rebuilds to full dormer transition re-flashing.

Dormer repairs target the joints where the dormer meets the main roof — every repair below addresses a specific, verifiable failure point:
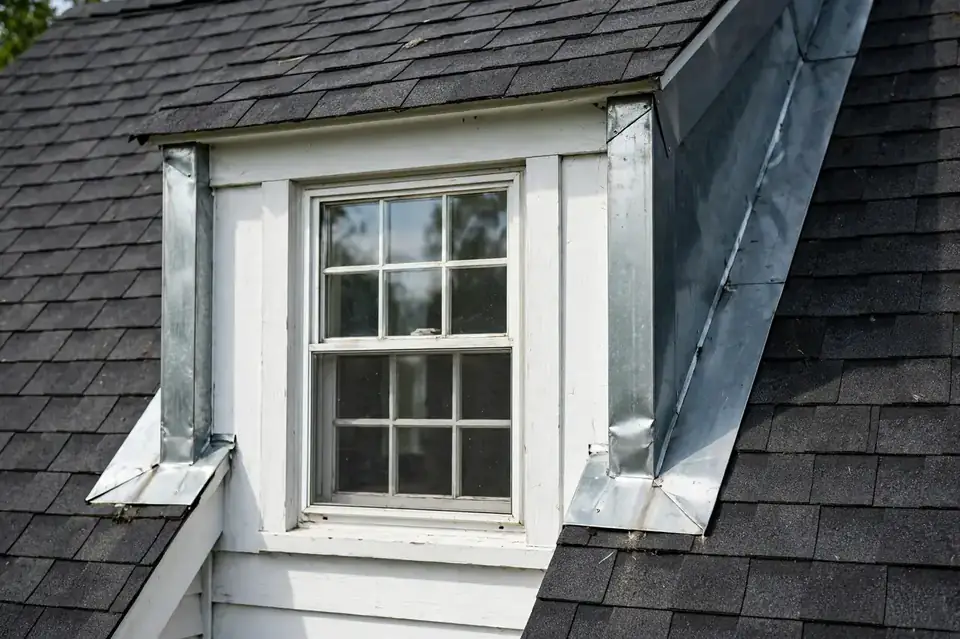
Failed step flashing along the dormer cheeks replaced course by course, woven with the shingles so each piece overlaps the one below — water always moves outward and down.
The small angled flashing where the dormer sidewall meets the roof at the gutter line. It kicks runoff outward into the gutter instead of behind the siding — its absence causes serious hidden rot.
The flashing across the dormer's front, bridging from the dormer roof up under the wall above it — rebuilt when corroded, separated, or improperly lapped.
Siding reinstalled with proper clearance above the roof surface — typically an inch or two — so it stays out of standing water instead of wicking it upward.
The valley where the dormer roof ties into the main roof plane re-flashed and re-sealed where wear, debris, or settling has opened the joint.
When the transition is opened, sheathing and framing behind the cheeks are inspected. Damage found there is documented and addressed as part of the agreed scope — no fixed-price guessing before the joint is exposed.
Even small discoloration near a dormer. What it may indicate: water entering at a failed flashing joint and traveling inside the wall cavity — the stain marks the exit, not the entry. Next step: have the dormer transition inspected, not just the stained area.
Deteriorating finish on the dormer's side walls, especially near the base. What it may indicate: chronic moisture behind the siding from a flashing failure. Next step: probe the area — softness means the damage goes deeper than paint.
Moisture appearing around a window under or beside a dormer after rain. What it may indicate: water from the dormer joint running down inside the wall and exiting at the window opening. Next step: look up, not down — the source is above the window.
Daylight or separation where the dormer sidewall meets the roof surface, or siding sitting directly on the shingles. What it may indicate: failed or missing step flashing, or lost siding clearance. Next step: don't caulk the gap — it needs proper flashing, not sealant.
Runoff pouring down the siding at the dormer's base instead of into the gutter. What it may indicate: a missing or backwards kick-out diverter dumping water behind the siding. Next step: this one causes hidden rot fast — prioritize it.
Water marks rooms away or a floor below the nearest dormer. What it may indicate: water following gravity and framing inside the wall cavity from a distant entry point. Next step: trace the path upward professionally before authorizing repairs.
Dormer flashing is a system, not a single part. Each component has a specific job, and the repair has to respect all of them:
A series of small L-shaped metal pieces, one per shingle course, climbing each dormer cheek. Each piece overlaps the one below so water always moves outward and down. Replacement means removing siding at the cheek and rebuilding the full run — there is no shortcut that lasts.
The angled flashing at the sidewall base that throws runoff into the gutter. Missing or backwards kick-outs are one of the most destructive dormer defects because the damage hides behind siding for years. Every dormer base should have one.
Spans the dormer's front, bridging from the dormer roof up under the wall above. It must lap correctly with both the roofing below and the wall cladding above — a frequent failure point on older dormers.
Flashing metals must be compatible with each other and with the roofing: copper against galvanized steel causes galvanic corrosion that eats the joint. Siding clearance — the gap between siding bottom and roof surface — is part of the repair, not a cosmetic detail.
Realistic scope: a proper dormer flashing repair opens the transition — siding comes off at the cheek. Anyone offering to fix dormer flashing without removing siding is proposing a surface patch, not a repair. Structural rebuilding beyond the flashing assembly is only scoped after the joint is opened and the damage is documented.
Dormers punch valleys and sidewalls through the main roof — joints that handle a lot of water. Most dormer wear is schedulable; wind-lifted shingles or open valleys around a dormer are not.
In Secaucus, big commercial flat roofs can pond and fail suddenly — a wide new stain after rain deserves an urgent look.
In Secaucus, ponding only gets worse while you wait: Emergency help →
Dormer leaks don't fix themselves — and water inside a wall cavity only travels further. Call to discuss dormer repair options for your Secaucus home.
Call (201) 330-4743A dormer repair follows a clear sequence — investigation first, scope second:
Inside and outside: moisture tracing, insulation checks, and a full examination of the dormer transition — cheek flashing lines, apron flashing, kick-out diverters, siding clearance, and valley condition.
What's actually failing is identified and documented — the entry point, the condition of the flashing, and any concealed damage found when the transition is opened.
The repair scope is defined from the findings: what gets rebuilt, what materials are used, and what would expand the job. Nothing is priced before the joint is exposed.
The approved work is completed — flashing rebuilt, diverters installed, siding re-integrated with proper clearance — and the repair is verified afterward.
Most dormer problems are flashing problems — and flashing problems get flashing repairs. The honest boundary:
The scope should follow what the opened joint reveals — documented with photos, not assumed. Be wary of anyone quoting a full rebuild without exposing the transition first.
No invented prices — but these are the factors that set the real number:
Each dormer is its own flashing assembly. Checking and repairing siblings during the same visit costs less than a second call later.
One cheek re-flashed versus a full transition rebuild with apron, kick-outs, and valley work.
Rotted sheathing or framing behind the cheeks expands the scope beyond flashing — discovered only when the joint is opened.
Some sidings remove and reinstall cleanly; others complicate re-integration and add labor.
Dormer height, roof pitch, and building access all affect setup time and safety requirements.
Standard flashing metals versus specialty materials needed to match existing roofing and cladding.
A firm figure only exists after inspection — anyone quoting a fixed price without exposing the transition is guessing.
Water entering at a failed dormer flashing joint travels inside the wall cavity, following gravity and framing — not the floor plan. It surfaces wherever it finds an exit, which can be a room or two away or a floor below. The stain marks the exit; the dormer transition is the entry. That's why tracing the path matters more than patching above the stain.
It depends on your property's governing documents. In many Secaucus garden-apartment and townhome communities, the association is responsible for exterior elements while the unit owner handles interior finishes — but arrangements vary. Check your documents and raise the issue with the property manager before authorizing any exterior work.
A small angled flashing where the dormer's sidewall meets the roof at the gutter line. It kicks runoff outward into the gutter instead of behind the siding. Missing kick-outs are among the most destructive dormer defects because the rot they cause hides behind siding for years.
Not properly. The step flashing sits behind the siding at the cheek, so reaching it means opening that transition. Anyone offering to fix dormer flashing without removing siding is proposing a surface patch, not a repair.
All of them, at least visually. Dormers flashed at the same time with the same materials tend to fail on the same schedule — the one leaking today is usually just the first. Checking siblings during the same visit costs far less than a second call later.
Most localized flashing rebuilds are completed in a single visit once the scope is agreed. Broader work — multiple dormers, or rot found behind the cheeks — takes longer. The timeline should be stated as part of the agreed scope.
The number of dormers involved, the extent of the flashing rebuild, hidden damage found when the transition is opened, siding type, access and height, and material matching. A firm figure only exists after inspection.
Dormer work often pairs with these — same roof, related craft:

Step flashing rebuilt around brick chimneys — the same craft as dormer cheeks, one visit instead of two.
Flashing repair
Dormer transitions on tile roofs need tile-specific flashing — those scopes belong in one conversation.
Tile repair
The broad Secaucus roof repair hub — surrounding decking and roof areas assessed together with the dormer.
Secaucus roof repair
Active dormer leaks and storm damage — urgent response when water is coming in now.
Emergency helpLeaking dormer, stained ceilings, or flashing that's had enough — call now to discuss dormer repair options for your Secaucus home.
Call Now — (201) 330-4743Emergency calls answered 24/7.